


Keeping your vape tank clean is one of the best ways to make sure that your flavour remains good and that your vaping experience is as good as it can be.
If you allow grime and residue to build up on the inside of your tank, you’ll find that eventually your e-juice will start to develop an unpleasant taste, and your e-cigarette’s performance will begin to deteriorate.
You can rectify this by maintaining your vape tank regularly and keeping it in good condition.
Here are some of the quickest and easiest ways of cleaning a vape tank.
How to Clean a Vape Tank
Rinsing
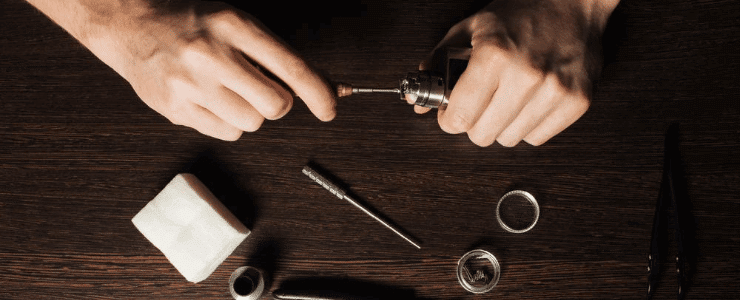
This is a common and simple way of keeping your vape tank clean. First, take your tank apart into as many pieces as it can break down into.
You will also need to remove the O rings carefully as much of the old flavour will be trapped there. If you’re using a device that has replaceable coil heads, remove the coil head before you clean.
If it’s still in reasonable condition, you can re-use it, but if the flavour is a problem, replacing it with a new coil head is the best idea Fill a bowl with water and microwave it for around 2 minutes while you rinse your tank parts in the sink.
Once the water is warm, take it out of the microwave and put your tank pieces into it. Allow the tank to sit in the water until it cools then rinse once more under the sink.
Dry the tank carefully with a paper towel then leave to fully dry. You may use a small cleaning brush to keep your tank clean.
These are available cheaply, or alternatively, you can use a child’s toothbrush instead.
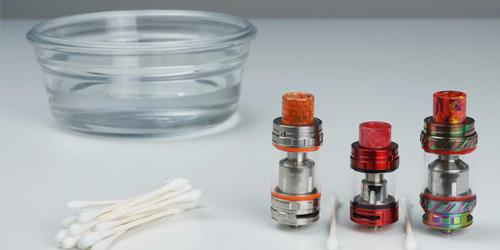
Soaking in PG/VG
Should you prefer not to use tap water, you could soak the tank in PG instead. Just fill the bowl with unflavoured PG and allow your tank to soak.
While you could use VG instead, this is a thicker liquid so isn’t as effective when cleaning tanks. After your tank has soaked for a while in PG, put it upright on a napkin and allow it to drip dry.
The Ultrasonic Cleaner
Cleaning your vape can be an extremely tedious, dull, and annoyingly difficult experience.
Thankfully, an ultrasonic cleaner can make this process so much easier.
Often used to clean metals and expensive jewellery, an ultrasonic cleaner aims to deep clean your atomizer with complete ease.
All you need to do is fill the cleaner with water and then turn it on. Keep it running until all parts of the tank are sparkling clean, and that’s all there is to it.
Other Rinse Agents
There are a number of other substances which you may have in your home which can be used as an alternative to PG or water.
Vinegar – its acidic properties make it great for cleaning tanks; however, you need to rinse it thoroughly as otherwise, its smell will linger.
Baking soda – this will get your tank sparkling clean.
Ethanol – grain alcohol is another excellent cleaning substance but don’t confuse it with Isopropyl alcohol.
Dishwashing detergent – remember to rinse well with water afterwards.
How to Clean Coils
A slightly more difficult process than cleaning an atomizer is the task of cleaning the coil.
There are two types of coils commonly found within a standard vape kit.
These two coil types are the coil heads found in replaceable tanks and the coils found in rebuildable kits.
The methods required to clean each of these coils is different in several aspects.
Replaceable Coils
Coils that are found within replaceable sub-ohm vape tanks cannot easily be cleaned.
Their purpose is to be used a few times and then easily replaced as opposed to being routinely cleaned.
The main reason why replaceable coils cannot be fully cleaned is due to the presence of the wick.
Soaking the coil with water will cause the wick to become too wet to re-light, therefore causing the vape to stop functioning.
At the least, you will have to wait for the water to evaporate fully from the device before you can attempt to use it.
However, if you still wish to clean your replaceable coil heads then simply use the standard soak and rinse method.
This involves soaking the coil in ethanol, rinsing it under the tap, rinsing it again with distilled water and letting the water evaporate from the device over time.
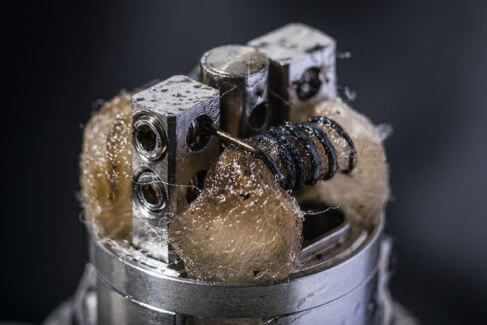
Rebuildable Coils
On the other hand, cleaning rebuildable coils is an absolute must for any rebuildable vape user.
If a rebuildable vape kit goes without cleaning for a prolonged period, then the coils will often not function correctly, leading to a lack of vapour production and a lack of flavour.
The very first step when cleaning a rebuildable coil is to remove the wicks.
If the coils are not overly dirty, then a simple light burn should solve the problem, burning away any remaining liquid.
If this is the case, then just let them cool themselves down and re-wick.
If a deeper clean of the coils is necessary, then try removing the wicks, dry burning the coils lightly, removing the atomizer, running them under some water then brushing them all gradually and carefully with a toothbrush or specialized coil cleaning tool.
Hopefully, this should clean your rebuildable coils quickly and with relative ease.
Change the Coil Head
If you’ve tried all of these methods and your flavour still isn’t quite right, try changing your coil head. You can either buy a fresh one or build your own.
If you already use a rebuildable atomizer though, try taking the cotton out, burning off the remainder of the e-juice and then rinsing first before throwing away the coil.
You can brush the coil with a toothbrush and see if it makes any difference.
There are many excellent ways of cleaning a vape tank, although some methods are easier and quicker than others.
Experiment with the various methods here and see which suits your needs best.
How to Clean a Vape Pen
There are several steps to consider when cleaning your vape pen. First, you must remove the tank from the device if you can do so.
Cleaning this should be an easy task, simply rinse it with warm water and dry carefully using a paper towel.
Next is the battery component on the device. Take care to ensure that no water is used when cleaning this component as this could cause a malfunction in the wiring of the device, leading it to stop working.
Instead, use a soft cloth on the battery pack to wipe away any marks or build-ups.
Many one-piece vape starter kits have intricate wiring all over them, meaning that cleaning the device is not an easy task as simply rinsing the kit is not an option.
Instead, try using a Q-tip soaked in distilled water to clean the components within the pen.